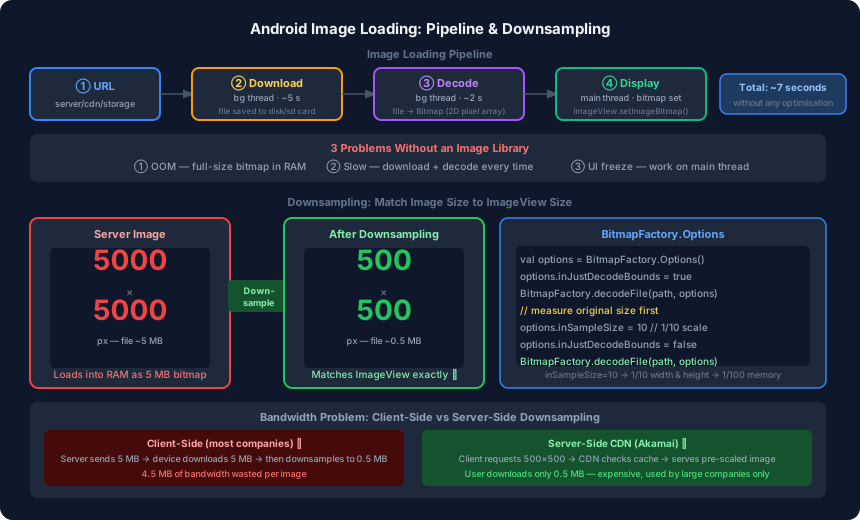
Loading images in a RecyclerView sounds straightforward — fetch a URL, show the image. But without an image-loading library, that simple task involves a chain of steps where memory errors, slow performance, and frozen UIs are all waiting to happen. Understanding the pipeline is what separates writing code that works from writing code that scales.
The Naive Approach and Its Problems
A basic implementation without any library looks something like this:
// Inside RecyclerView.Adapter onBindViewHolder — pseudocode
val url = item.imageUrl

// Background thread: download file
val file = downloadToFile(url, destinationPath)

// Background thread: decode file into bitmap
val bitmap = BitmapFactory.decodeFile(file.path)

// Main thread: set on ImageView
imageView.setImageBitmap(bitmap)
This code is technically correct but has three serious problems in practice:
| Problem | Cause |
|---|---|
| Out of Memory (OOM) | Full-resolution bitmap loaded into RAM |
| Slow loading | Download + decode repeated every scroll |
| UI freeze | Heavy work leaking onto the main thread |
Libraries like Glide solve all three, but knowing how they solve them requires understanding the pipeline first.
The Image Loading Pipeline
Every image goes through exactly two steps before it can appear on screen:
Step 1 — Download (~5 seconds)
The image file (e.g. profile.png) lives on a remote server. Your device downloads it over the network and saves it to local storage — the internal file system or SD card. At this point you have a file, not something you can display.
Step 2 — Decode (~2 seconds)
A file cannot be rendered directly. Android needs a Bitmap — a two-dimensional array where each cell holds the colour value of one pixel. The process of reading a file and constructing that array is called decoding. BitmapFactory.decodeFile() does this work.
Only after decoding can the bitmap be handed to an ImageView.
Total cold-load time without caching: ~7 seconds. For a RecyclerView with dozens of images, that is unacceptable.
What Is a Bitmap?
A bitmap is literally a grid of pixels. An image that is 500×500 pixels is a 500-row, 500-column array where each cell stores a colour (typically 4 bytes: red, green, blue, alpha).
500 × 500 × 4 bytes = ~1 MB in RAMA 5000×5000 image at the same colour depth:
5000 × 5000 × 4 bytes = ~100 MB in RAMThat single image could consume more than half the typical app memory budget.
The OOM Problem
A server stores high-resolution originals — often 5000×5000 pixels or larger. Your device has an ImageView that is 500×500 pixels. Loading the full 5000×5000 image and then displaying it in a 500×500 slot means you used 100× more memory than necessary.
Load 10–15 such images in a RecyclerView simultaneously and the app crashes with OutOfMemoryError.
Solution: Downsampling
Downsampling reduces the image to match the actual display size before loading it into RAM. The quality remains perfectly adequate because you are displaying at the target resolution — there is no information lost that the user would ever see.
How it works conceptually: when an image is sampled down, the decoder averages groups of neighbouring pixels into a single pixel. A 3×3 block of red pixels becomes one red pixel. The visual result is identical at display size.
Android provides BitmapFactory.Options for this:
fun decodeSampledBitmap(filePath: String, targetWidth: Int, targetHeight: Int): Bitmap {
    // First pass: measure dimensions without loading pixels into memory
    val options = BitmapFactory.Options().apply {
        inJustDecodeBounds = true
    }
    BitmapFactory.decodeFile(filePath, options)

    // Calculate the appropriate inSampleSize
    options.inSampleSize = calculateSampleSize(options, targetWidth, targetHeight)
    options.inJustDecodeBounds = false

    // Second pass: decode with downsampling applied
    return BitmapFactory.decodeFile(filePath, options)
}

fun calculateSampleSize(options: BitmapFactory.Options, targetW: Int, targetH: Int): Int {
    val (rawW, rawH) = options.outWidth to options.outHeight
    var sampleSize = 1
    while (rawW / sampleSize > targetW || rawH / sampleSize > targetH) {
        sampleSize *= 2
    }
    return sampleSize
}
inSampleSize = 10 means decode at 1/10th width and 1/10th height → 1/100th the memory. A 5 MB bitmap becomes 0.05 MB.
Glide handles this automatically — it reads the ImageView dimensions before decoding and applies the correct inSampleSize for you.
The Bandwidth Problem
Downsampling on the device fixes the OOM problem but does not fix bandwidth waste. The sequence is:
Server sends 5 MB → device downloads 5 MB → device scales to 0.5 MBThe user paid 5 MB of data transfer to display a 0.5 MB image. On mobile data, especially in regions with expensive or slow networks, this matters.
Client-Side (Most Apps)
Most companies accept this trade-off. Server stores one high-resolution original; clients download it and downsample locally. Simple to implement, costs users bandwidth.
Server-Side CDN (Large Companies)
A CDN service like Akamai can serve pre-scaled images:
- Client requests an image and sends its required dimensions (e.g. 500×500).
- Akamai checks its cache for a 500×500 version.
- If cached, it returns the small image immediately.
- If not, it fetches the original from the source, scales it to 500×500, caches that version, and returns it.
The user downloads only 0.5 MB instead of 5 MB. But Akamai and similar services are expensive — typically only large companies like Facebook, Instagram, or Netflix use them at scale.
What Glide Handles for You
The naive code at the top of this post requires you to implement all of this manually. Glide does it in one line:
Glide.with(context)
    .load(imageUrl)
    .into(imageView)
Internally, Glide:
- Runs download and decode on background threads (no UI freeze)
- Reads the
ImageViewsize and applies the correctinSampleSize(no OOM) - Caches the result so subsequent loads are instant (no slow repeat)
- Cancels in-flight requests when the
ImageViewleaves the screen (no wasted work)
The next two posts cover those last two points in detail: how unwanted task cancellation works, and how the two-level caching strategy is built.