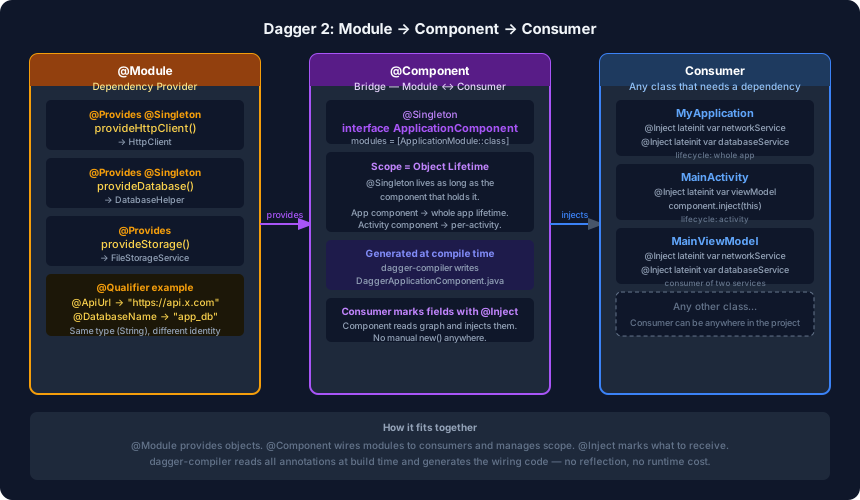
In the previous post we saw that following Dependency Injection and Inversion of Control principles forces you to write more assembly code — manually creating Motor, passing it into Engine, passing that into Car. In a real project with dozens of interconnected classes, that manual wiring becomes a significant maintenance burden. Dagger 2 exists to eliminate that burden by generating the wiring code for you at compile time.
Why Use a DI Framework at All?
Three concrete reasons:
1. Managing Dependencies at Scale
In a large project, a single object might need to travel through five or ten layers before reaching the class that uses it. Writing that chain by hand means any change to a dependency ripples through every call site.
// Without Dagger — every call site owns the full chain
val retrofit    = Retrofit.Builder().baseUrl(BASE_URL).build()
val apiService  = retrofit.create(ApiService::class.java)
val networkRepo = NetworkRepository(apiService)
val viewModel   = MainViewModel(networkRepo)
Dagger generates this chain once and injects it wherever it is needed, with no duplication.
2. Unit Testing with Mock Dependencies
Because Dagger injects through interfaces, swapping a real dependency for a test double requires only changing what the module provides — the class under test stays untouched.
// In tests: provide a mock instead of the real implementation
class TestNetworkModule {
    @Provides
    fun provideApiService(): ApiService = MockApiService()
}
3. Scope Management Without Boilerplate
Managing a thread-safe singleton manually requires double-checked locking, volatile fields, and careful reasoning about the Java Memory Model (covered in the previous post). Dagger reduces that to a single annotation:
@Provides
@Singleton
fun provideDatabase(): DatabaseHelper = DatabaseHelper()
Dagger generates the thread-safe singleton code at compile time — correctly, every time.
Dagger 1 vs Dagger 2
Dagger 1 (originally by Square) used reflection to discover classes and create objects at runtime. Reflection is flexible but slow — the JVM has to scan class files and method signatures dynamically on every lookup.
Dagger 2 (by Google) uses compile-time code generation instead. During the build, the dagger-compiler annotation processor reads your annotations and generates plain Java/Kotlin source files that do the wiring. At runtime, Dagger calls these generated classes directly — no scanning, no reflection overhead, no runtime surprises.
Gradle Setup
// build.gradle.kts
dependencies {
    implementation("com.google.dagger:dagger:2.42")
    kapt("com.google.dagger:dagger-compiler:2.42")
}
Two separate artifacts:
dagger— contains only the annotations (@Module,@Component,@Inject, etc.). This ships inside your APK.dagger-compiler— contains the annotation processor that generates wiring code. It runs only during the build and is not included in the APK.
The Three Building Blocks
@Module — Dependency Provider
A @Module class is where you tell Dagger how to create objects. Think of it as a configuration file: “if anyone needs an HttpClient, here is how to build one.”
@Module
class ApplicationModule(private val app: MyApplication) {

    @Singleton
    @Provides
    fun provideHttpClient(): HttpClient {
        return HttpClient()
    }

    @Singleton
    @Provides
    fun provideDatabase(): DatabaseHelper {
        return DatabaseHelper(app)
    }

    @Provides
    fun provideFileStorage(): FileStorageService {
        return FileStorageService()
    }

    fun helperMethod(): String = "ignored" // no @Provides — Dagger skips this
}
Two important rules:
- Only methods annotated with
@Providesare visible to Dagger. Any other method in the class is ignored entirely. - The return type is what Dagger tracks, not the method name. The name is just documentation.
A project can have any number of modules — one per feature, one per layer, whatever makes sense. Dagger scans all of them.
@Component — The Bridge
A @Component interface is the bridge between modules and consumers. It declares which modules it reads from and which consumers it can inject into.
@Singleton
@Component(modules = [ApplicationModule::class])
interface ApplicationComponent {
    fun inject(app: MyApplication)
    fun inject(activity: MainActivity)
}
When the project builds, dagger-compiler generates a concrete implementation called DaggerApplicationComponent. You instantiate it once and use it to trigger injection:
class MyApplication : Application() {
    lateinit var applicationComponent: ApplicationComponent

    override fun onCreate() {
        super.onCreate()
        applicationComponent = DaggerApplicationComponent
            .builder()
            .applicationModule(ApplicationModule(this))
            .build()
        applicationComponent.inject(this)
    }
}
@Inject — Marking the Consumer
On the consuming side, annotate the fields (or constructor parameters) that Dagger should fill in:
class MyApplication : Application() {
    @Inject lateinit var networkService: NetworkService
    @Inject lateinit var databaseService: DatabaseService
}

class MainViewModel @Inject constructor(
    private val networkService: NetworkService,
    private val databaseService: DatabaseService
)
Dagger reads @Inject, looks through the registered modules for a provider whose return type matches, and wires them together — all at compile time.
Scope: Controlling Object Lifetime
Scope is one of the most powerful features of Dagger. It controls how long a provided object lives.
@Singleton
@Component(modules = [ApplicationModule::class])
interface ApplicationComponent
The @Singleton annotation on the component means every @Singleton-annotated provider inside that component returns the same instance for the lifetime of that component.
Since MyApplication creates the component and holds a reference to it for the life of the process, @Singleton objects effectively live for the entire app session.
| Scope | Component | Object lifetime |
|---|---|---|
@Singleton | ApplicationComponent | Entire app process |
@ActivityScope (custom) | ActivityComponent | Single activity instance |
| No scope | Any | New instance on every injection |
Without Dagger you would need to implement this with double-checked locking for each singleton. With Dagger you declare the scope and the generated code handles the rest.
@Qualifier: Two Providers of the Same Type
Suppose a module needs to provide two different String values — an API URL and a database name. Both have the same type. Dagger would not know which one to inject where.
@Qualifier annotations solve this by giving each provider a distinct identity:
// Define qualifiers
@Qualifier @Retention(RUNTIME) public @interface ApiUrl {}
@Qualifier @Retention(RUNTIME) public @interface DatabaseName {}
// Provide with qualifiers
@Module
class AppModule {
@Provides @ApiUrl
fun provideApiUrl(): String = "https://api.example.com"
@Provides @DatabaseName
fun provideDatabaseName(): String = "app_database"
}// Consume with qualifiers
class NetworkRepository @Inject constructor(
@ApiUrl private val baseUrl: String
)
class LocalRepository @Inject constructor(
@DatabaseName private val dbName: String
)Dagger matches by type and qualifier together. Without the qualifier, two String providers would cause a compile-time error — Dagger cannot resolve the ambiguity.
Putting It All Together
The flow is always the same:
@Module         →      @Component      →     Consumer
(provides deps) (bridges + scopes) (@Inject fields)- You annotate providers in a
@Module. - A
@Componentdeclares which modules it uses and which consumers it serves. - Consumers mark what they need with
@Inject. - At build time,
dagger-compilergeneratesDaggerXxxComponent— a plain class with no reflection. - At runtime, you build the component once and call
inject(). Everything is wired.
The result is the same clean, decoupled code that manual DI produces — but without writing the assembly chains yourself, without managing singleton boilerplate, and with compile-time validation that every dependency can actually be satisfied.